 Kia Forte: Refrigerant Recovery
Use only service equipment that is U.L-listed and is certified to meet
the requirements of SAE J2210 to remove HFC-134a(R-134a) from the air conditioning
system.
|
If accidental system discharge occurs, ventilate work area before resume
of service.
Additional health and safety information may be obtained from the refrigerant
and lubricant manufacturers.
| 1. |
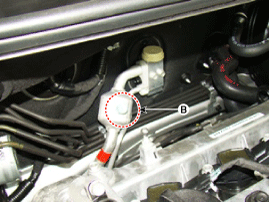
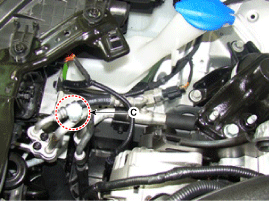
Connect an R-134a refrigerant
Recovery/Recycling/Charging System (A) to the low-pressure service
port (B) and the high-pressure service port (C) as shown, following
the equipment manufacturer's instructions.
|
| 2. |
Measure the amount of refrigerant oil removed from the A/C system
after the recovery process is completed. Be sure to install the same
amount of new refrigerant oil back into the A/C system before charging.
|
System Evacuation
Use only service equipment that is U.L-listed and is certified to meet
the requirements of SAE J2210 to remove HFC-134a(R-134a) from the air conditioning
system.
|
If accidental system discharge occurs, ventilate work area before resume
of service.
Additional health and safety information may be obtained from the refrigerant
and lubricant manufacturers.
| 1. |
When an A/C System has been opened to the atmosphere, such as
during installation or repair, it must be evacuated using an R-134a
refrigerant Recovery/Recycling/Charging System. (If the system has been
open for several days, the receiver/dryer should be replaced, and the
system should be evacuated for several hours.)
|
| 2. |
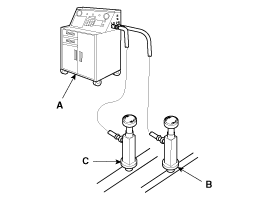
Connect an R-134a refrigerant Recovery/Recycling/Charging System
(A) to the high-pressure service port (B) and the low-pressure service
port (C) as shown, following the equipment manufacturer's instructions.
|
| 3. |
If the low-pressure does not reach more than 93.3 kPa (700 mmHg,
27.6 in.Hg) in 10 minutes, there is probably a leak in the system. Partially
charge the system, and check for leaks (see Refrigerent Leak Test.).
|
| 4. |
Remove the low pressure valve from the low-pressure service port.
|
System Charging
Use only service equipment that is U.L-listed and is certified to meet
the requirements of SAE J2210 to remove HFC-134a(R-134a) from the air conditioning
system.
|
If accidental system discharge occurs, ventilate work area before resume
of service.
Additional health and safety information may be obtained from the refrigerant
and lubricant manufacturers.
| 1. |
Connect an R-134a refrigerant
Recovery/Recycling/Charging System (A) to the high-pressure service
port (B) as shown, following the equipment manufacturer's instructions.
|
| 2. |
Add the same amount of new refrigerant oil to the system that
was removed during recovery. Use only specified refrigerant oil. Charge
the system with 530 ┬▒ 25g of R-134a refrigerant. Do not overcharge the
system the compressor will be damaged.
|
Refrigerant Leak Test
Always conduct a leak test with an electronic leak detector whenever leakage
or refrigerant is suspected and when conducting service operations which are
accompanied by disassembly or loosening or connection fittings.
In order to use the leak detector properly, read the manual supplied
by the manufacturer.
|
If a gas leak is detected, proceed as follows:
| 1. |
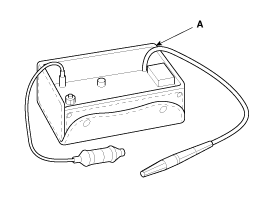
Check the torque on the connection fittings and, if too loose,
tighten to the proper torque. Check for gas leakage with a leak detector
(A).
|
| 2. |
If leakage continues even after the fitting has been tightened,
discharge the refrigerant from the system, disconnect the fittings,
and check their seating faces for damage. Always replace, even if the
damage is slight.
|
| 3. |
Check the compressor oil and add oil if required.
|
| 4. |
Charge the system and recheck for gas leaks. If no leaks are found,
evacuate and charge the system again.
|
 Component Location
[Engine Room]
1. Receiver Drier
2. Condenser
3. Ambient Temperature Sensor
4. Compressor
5. Discharge Hose
6. Suction & Liquid Tube Assembly
7. Servic ...
See also:
Purge Control Solenoid Valve (PCSV) Inspection
1.
Turn the ignition switch OFF.
2.
Disconnect the PCSV connector.
3.
Measure resistance between the PCSV termi ...
Description
The SMART KEY system is a system that allows the user to access and operate
a vehicle in a very convenient way. To access the vehicle, no traditional key
or remote control unit is needed.
...
Multimedia Jack Installation
1.
Install the multimedia jack.
2.
Connect the multimedia jack connector.
3.
Install the floor console assembly ...
Copyright ® www.kifomanual.com 2014-2025


